I’ve spent over 25 years as a professional photographer in Alaska, and I know how a single lens can change the way you see a scene. Choosing the right glass shapes your style and how you record light, sharpness, and vast landscapes.
The Nikon 14mm f/2.8 is one example I return to for sweeping skies and night work on a mirrorless camera. That f/2.8 aperture gives a bright view and helps keep stars crisp while maintaining excellent image quality.
What I learned after years of testing lenses in real conditions
I’ve tested a lot of lenses over time, and one thing became clear to me: the specs on paper don’t always match what you experience in the field. I remember buying a cheaper wide-angle zoom thinking it would “do the job,” but once I reviewed my shots, the soft edges and distortion were impossible to ignore—especially in landscapes where detail matters across the entire frame. Since then, I’ve leaned toward simpler setups and lenses I can truly trust, even if that means fewer options in my bag.
In my experience, there’s no perfect lens for everyone, and I don’t believe in chasing gear expecting instant results. What actually made the biggest difference for me was learning how my lens behaves in different situations—how it handles light, where it loses sharpness, and how far I can push it before quality drops. That kind of familiarity matters more than constantly upgrading equipment.
I’ve found that the best results come from understanding your gear deeply, not just owning “better” gear.
If I had to give one practical tip, it would be this: take your lens out and test it intentionally—shoot the same scene at different apertures, check the corners, and see how it reacts to strong light sources. This small habit helped me avoid mistakes in important shoots and made my workflow more consistent. It’s simple, but it builds real confidence over time.
At the end of the day, good photography isn’t about having the most expensive setup—it’s about making informed choices and knowing how to use what you have effectively. That mindset has saved me money, time, and a lot of frustration.
A high-quality wide-angle lens brings depth that standard optics can’t match. Mind barrel distortion and how a lens barrel performs at the edges if you want consistent results in landscape photography.
Key Takeaways
- I rely on durable, sharp lenses to capture Alaska’s vast scenes.
- A 14mm f/2.8 often gives the view and light needed for dramatic photos.
- Check barrel distortion and edge performance before you buy.
- Mirrorless cameras pair well with compact, high-quality glass.
- Your lens choice defines your field of view and photographic style.
Understanding the Appeal of Wide Angle Photography
I often reach for a short focal length when I want a scene to feel vast and alive. That choice gives a real sense of scale and puts subjects into context.
Using a wide angle lens on a camera lets me include more environment, so the final image tells a fuller story. For landscapes and environmental portraits, wide-angle lenses reveal foreground detail and distant horizons that change the mood.
Many photographers favor these lenses because of their compact size and unobtrusive handling. On busy streets or when I travel, smaller cameras and lenses let me work faster and stay aware of the scene.
What I rely on:
- High-quality glass to capture complex scenes that a standard prime or zoom can’t.
- Tools that help place a subject inside an environment for stronger narrative.
- Versatility for sports, travel, and creative landscape work.
Why I Recommend the Best Wide Angle Primes Over Zooms
A dedicated prime gives predictable sharpness that helps me trust each exposure. When I pick a fixed focal length, I accept less flexibility for better optical results.
The Case for Fixed Focal Lengths
Optical consistency is the main reason I reach for a prime. A single lens often delivers superior image quality compared to many budget zooms.
Using one focal length trains your eye and your composition skills. Over time, my range of creative choices grew because I learned to work within limits.
Avoiding Edge Softness
One big advantage of a prime is even sharpness across the frame. Cheap zooms can lose detail at the edges, which hurts landscape and night photography.
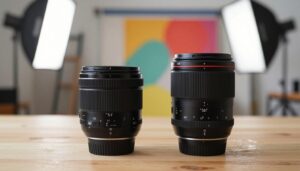
The Nikon 14mm f/2.8, for example, is powerful but heavy and costly. For daily use, many photographers prefer a compact prime that keeps weight down without sacrificing overall quality.
- I recommend fixed lenses for steady sharpness and reliable image results.
- Choosing one focal length helps you master composition and depth.
- Avoids the edge softness common in lower-grade zooms.
Defining Wide and Ultra Wide Focal Lengths
Choosing the right focal length changes how much of the scene you can hold in a single frame. In full-frame terms, I consider roughly 24mm–35mm to be the practical range for a true wide angle lens.
A 24mm lens often feels like the standard for landscape work. Anything shorter than that moves into ultra-wide territory and captures a much broader view of the frame.
When I teach students, I stress that a zoom covering 24–35mm gives versatility, but a single focal length can deliver superior image quality and more predictable edge performance.
Understanding these focal lengths helps you match a lens to your camera and subject. For landscapes or architecture, pick the length that gives the view you need without unwanted distortion.
- I start kit planning by defining where wide ends and ultra-wide begins — usually around 20mm.
- Using a zoom in this range adds flexibility at the possible cost of some image quality.
- Knowing the focal length range makes it easier to choose lenses that suit your cameras and shooting style.
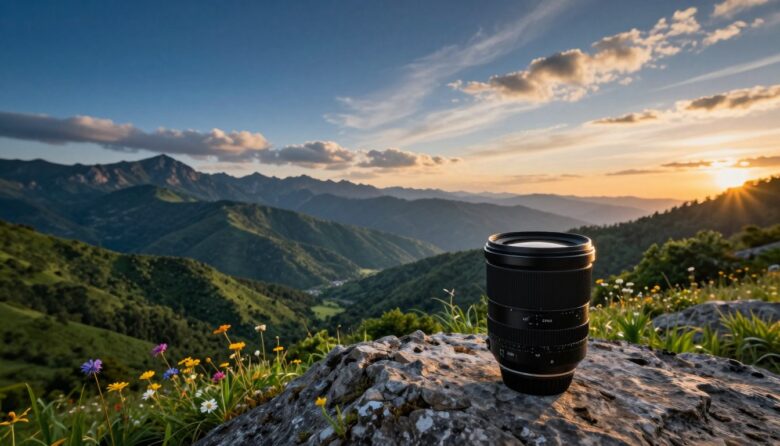
Essential Factors for Landscape and Astrophotography
Small decisions about glass and settings shape the success of landscape and star work. I focus on a few key factors that matter in the field: depth control, flare management, and gear protection.
Depth of Field Considerations
I set aperture to balance foreground sharpness and star detail. For night work I often use an f/2.8 lens to gather enough light while keeping stars crisp.
Tip: Stopping down a couple of stops improves edge sharpness for landscapes without losing too much signal for astrophotography.
Managing Lens Flare
Wide angle lenses are prone to flare from bright sources. I use a dedicated lens hood and block stray light with my hand when necessary.
Good technique keeps contrast high and preserves color in the final image.
Protecting Your Front Element
I never expose the front glass unnecessarily. A hood helps with flare and impact protection.
Whether you favor manual or autofocus, keep a clear filter or cap on during travel to guard the element from scratches and moisture.
| Factor | Why it matters | My practical tip |
|---|---|---|
| Depth of field | Affects foreground and star sharpness | Use f/2.8 for stars; stop down for landscapes |
| Flare control | Preserves contrast and color | Use lens hood and shade bright sources |
| Front element care | Prevents damage and saves repairs | Keep cap/UV filter on when off-camera |
Evaluating Sharpness and Distortion in Modern Glass
I start every lens test by checking how it holds detail from center to corner. I look for even sharpness across the frame and note any falloff that shows up at the end of the field.
Sharpness matters: even an f/2.8 lens can reveal soft zones if the optical design struggles. I compare shots at working apertures to judge real-world performance, not just lab numbers.
The Sony 20-70mm f/4 has earned my trust as a workhorse. It delivers consistent image quality and clear detail across the frame, which makes it useful when I switch from landscape to quick handheld work on a camera.
Barrel distortion is common in wide angle glass, but modern software correction handles most issues. I still prefer lenses that start with good geometry because less correction preserves natural view and reduces artifacts.
- I inspect center and corner crops for sharpness and micro-contrast.
- I watch for barrel distortion and test corrections before final edits.
- Photographers who pixel-peep want a lens that keeps clarity to the end of the frame.
The Role of Aperture in Low Light Performance
In low light, the opening in your lens often matters more than the sensor behind it. A fast aperture controls how much light reaches the camera and sets the stage for clean night images.

For astrophotography, aperture is everything. I use lenses that let me shoot shorter exposures so stars stay sharp. A lens like the Laowa 15mm f/2 shines here because its wide aperture gathers plenty of light.
Using f/2.8 is a common rule of thumb. At that aperture you can capture the Milky Way without long exposures that create star trails. Many photographers stick to the f/2.8 range to balance exposure time and image quality.
Astrophotography and Star Trails
When I work in the field, a fast aperture reduces the need to stack many frames. It also gives better depth of field control for foreground and sky.
- A fast aperture like f/2.8 boosts low light performance and keeps images cleaner.
- The Laowa 15mm f/2 allows shorter exposures and less noise in single frames.
- Aperture affects depth of field and the overall image quality of your wide angle photography.
Considering Size and Weight for Travel
I judge a lens by how often it comes out of my bag on a long walk.
Compact gear keeps me shooting. The Fujifilm XF14mm f/2.8 balances neatly on mirrorless camera bodies like the X-T10. It gives a useful focal length in a small package so I carry it more than bulkier glass.
The Sigma 17mm f/4 is another travel hero. At just 250g it proves high quality need not come with high price or weight. For many photographers, that light length matters more than a heavy zoom that sits in the bag.
“Carry what you will actually use — weight decides your shooting day.”
| Model | Weight | Strength |
|---|---|---|
| Fujifilm XF14mm f/2.8 | Light, compact | Balanced on mirrorless camera; professional focal length |
| Sigma 17mm f/4 | 250 g | Portable, affordable, good image quality |
| Generic Zoom | Heavier | Flexible but less likely to travel well |
I always weigh size and style before a trip. A small lens that fits my mirrorless camera will see a lot more use than glass that is just impressive on paper.
- Tip: prioritize weight and balance to keep your shooting day long and comfortable.
Navigating Budget Options for Your Camera Bag
Shopping used gear taught me how far a careful lens purchase can stretch a dollar. I look for optical quality first and brand second.
Finding value in used markets means checking condition and testing on your camera before you buy. A well-maintained f/2.8 lens often shows far less wear than its price suggests.
Tip: the Bower 14mm f/2.8 is an exceptional value at about $419. It gives a real entry into wide angle photography without a steep price tag.

Finding Value in Used Markets
I recommend hunting used listings for a high-quality f/2.8 prime. You can often find glass with excellent image quality for a fraction of retail.
When inspecting a used lens, test for smooth focus, clear glass, and signs of fungus. Check the mount and make sure autofocus still works if your workflow needs it.
When to Avoid Cheap Zooms
Cheap wide-angle zoom lenses often sacrifice sharpness and suffer from pronounced barrel distortion. That loss shows up at the edge of the frame and hurts final image quality.
Many photographers buy a low-cost zoom, then regret it when they compare crops to a dedicated lens. If you must save money, choose a reputable manual lens like the Bower or a used f/2.8 from a trusted brand.
- Look used for value and test before you commit.
- Avoid cheap zooms if you need consistent sharpness and low barrel distortion.
- Confirm autofocus and mechanical condition when buying secondhand.
Tips for Mastering Your New Wide Angle Lens
Start by locking a focus distance and testing a few exposures to learn how your lens performs in the field.
On a 14mm, I set focus to 2 meters and stop down to f/8. That simple setup keeps everything from about 1 meter to infinity acceptably sharp. It’s an easy way to check sharpness and distortion before you commit to a longer shoot.
I suggest practicing with your mirrorless camera and trying different focal lengths to see how perspective changes your photos. Always glance at the lens barrel for a depth-of-field scale — it’s a fast, practical tool for street and landscape work.
- Use a fixed focus distance and stop down for consistent sharpness.
- Practice with both autofocus and manual focus to learn handling and performance.
- Note how a high-quality f/2.8 prime changes composition demands and image style.
- Watch for barrel distortion and manage light to avoid flare in your images.
- Carry a compact zoom or extra focal lengths to compare field results quickly.
“Set a simple routine and your lens will teach you more than any manual.”
Conclusion
Picking the right glass changes how you see light and scale in every frame.
I choose a lens that delivers consistent image quality and keeps me shooting. A compact wide-angle lens that balances quality and weight will leave my camera ready for long days on the trail.
Primes often beat zooms for pure sharpness and aperture control at f/2.8, but used or budget options can offer real value in price and performance. Learn your focal length, manage distortion, and carry the gear you will actually use.
Do this and your images of landscapes and night skies will hold up to close inspection. In the end, your choice of lenses will shape your photography more than any single kit change.
FAQ
What focal lengths qualify as ultra-wide for landscape and astrophotography?
I consider focal lengths from about 14mm to 24mm on full-frame cameras as ultra-wide. For APS-C sensor bodies, that translates roughly to 10mm–16mm. These ranges give a broad field of view that helps capture expansive landscapes and large portions of the night sky without requiring excessive panorama stitching.
Why do I prefer fixed focal length lenses over zooms for serious night and landscape work?
I rely on fixed focal lengths because they usually deliver better sharpness, less distortion, and wider maximum apertures for the same price and weight. That translates into crisper stars, cleaner corners, and faster exposures under low light compared with most zooms.
How much does aperture matter for star photography?
Aperture matters a lot. A lens with an f/2.8 or wider aperture lets me reduce exposure time and ISO, keeping stars sharp and noise lower. For deep-sky and faint-detail work, faster glass (f/1.8–f/2.8) makes a noticeable difference in image quality and flexibility.
Can small, lightweight lenses perform well for travel landscapes?
Absolutely. Modern compact options from Canon, Nikon, Sony, and Sigma balance sharpness and weight. I often pack a lightweight prime with good edge performance to keep my kit manageable while still getting high-quality images on the road.
How do I manage lens flare during sunrise or sunset shoots?
I control flare by using a lens hood, shading the front element with my hand when needed, and positioning the sun just outside the frame. Some lenses handle bright light better due to coatings; choosing glass with strong anti-reflection coating helps reduce ghosting and contrast loss.
Is edge softness a serious problem with ultra-wide lenses?
Edge softness can appear, especially at the widest apertures or with cheaper designs. I stop down one or two stops to improve corner sharpness for landscapes, or pick lenses known for strong edge performance if I need wide-open results for astrophotography.
How should I protect the front element of my lens in rough conditions?
I use clip-on UV or clear protective filters, keep a microfiber cloth and blower handy, and carry a rain cover for my camera. For rugged travel, a small lens hood plus a padded case reduces the chance of scratches and impact damage.
What about distortion and barrel effects—how much should I worry?
Distortion varies by design. Some classic ultra-wide lenses show barrel distortion, but most mirrorless manufacturers and third-party makers offer profiles that correct it in-camera or in post. I check test charts and sample images before buying to ensure correction is reliable.
Are used lenses a good option for expanding my kit on a budget?
Yes. I frequently find excellent value in the used market, especially from reputable dealers or trusted local sellers. I inspect aperture blades, autofocus function, and glass for haze or fungus before buying. Warranties or return policies make used purchases safer.
When should I avoid cheap zooms and opt for a prime instead?
I avoid inexpensive zooms when I need strong edge-to-edge sharpness, consistent micro-contrast, or very wide apertures. If you plan serious night-sky work or want maximum image quality for prints, investing in a quality prime usually pays off.
How do I choose lenses for different camera mounts like Sony, Canon, or Nikon?
I match my lens choice to my body’s mount, sensor size, and shooting style. Native lenses deliver the best autofocus and communication; however, high-quality third-party options from Sigma, Tamron, and Samyang often provide competitive optics at attractive prices for many mounts.
What role does autofocus performance play in astrophotography?
For most star work, I switch to manual focus because autofocus struggles in low light. That said, reliable AF helps for landscapes and twilight shots, so I prefer lenses with fast, accurate motors for wider use outside strict night-sky sessions.
How can I evaluate sharpness and distortion before buying a lens?
I read lab tests and real-world reviews that include resolution charts and sample files at multiple apertures. I look for measured sharpness across the frame, distortion graphs, and close-up samples to understand how the lens behaves in typical shooting scenarios.
Does sensor size affect how lenses behave for landscapes and stars?
Yes. Full-frame sensors give a wider field of view and often better high-ISO performance, while APS-C and Micro Four Thirds crop the field and can amplify depth-of-field. I pick focal length and aperture based on my sensor to achieve the desired composition and exposure.

Noah Sterling is a prime lens photographer and visual storyteller dedicated to capturing sharp, intentional imagery through fixed focal lengths. He shares practical insights on composition, depth, and lens choice, helping photographers master simplicity and achieve powerful, professional results.